Trezor Login: A Detailed Guide to Accessing Your Hardware Wallet Securely
Trezor Login is the process of accessing your Trezor hardware wallet through Trezor Suite, the official application used to manage your cryptocurrency accounts. Trezor devices such as the Trezor Model One and Trezor Model T are designed to store crypto assets offline, keeping private keys protected from online threats. Whether you are a beginner or an experienced crypto user, understanding how to properly log in, use the software, and protect your wallet is essential. This guide explains the Trezor Login process step by step and highlights important security practices.
Understanding Trezor Login
Trezor Login allows you to connect your hardware wallet to Trezor Suite so you can manage your crypto portfolio. Trezor Suite is available for Windows, macOS, Linux, and also has a web version. Through this login process, you can safely:
Monitor balances and asset values
Approve and send transactions
Receive cryptocurrencies securely
Update firmware and install apps
Manage multiple blockchain accounts
What makes Trezor Login secure is that your private keys never leave the device. This ensures that even if your computer is compromised, your funds remain safe.
Why Trezor Login Matters
Trezor Login is vital for maintaining full control over your digital assets. Some of the main benefits include:
1. Offline Security
Your private keys stay on the hardware wallet, not on your computer or online services.
2. Secure Transaction Approval
Every outgoing transaction must be physically confirmed on the Trezor device.
3. Easy Portfolio Access
You can manage multiple cryptocurrencies from a single interface.
4. Protection from Malware and Phishing
Trezor Suite includes security warnings designed to help you avoid unsafe websites and suspicious transactions.
Following the proper login procedure lowers your exposure to common online risks.
What You Need Before Logging In
To successfully complete the Trezor Login process, make sure you have:
A Trezor hardware wallet (Model One or Model T)
A USB cable to connect the device
Your 24-word recovery seed stored offline
Trezor Suite installed on your device
Having these items prepared will help you log in quickly and safely.
Step 1: Install and Open Trezor Suite
Begin by installing Trezor Suite from the official website.
Visit the official Trezor start page.
Download the version for your operating system.
Install and launch Trezor Suite.
Trezor Suite provides a clean dashboard where you can access all wallet functions once you are logged in.
Step 2: Connect Your Trezor Device
Next, connect your Trezor hardware wallet using the USB cable.
Open Trezor Suite.
Plug your Trezor into the computer.
Wait for the device to be recognized.
If this is your first time connecting, Trezor Suite may guide you through firmware installation or initial setup.
Step 3: Enter Your PIN
Your PIN is an essential layer of protection for your wallet.
Enter the PIN using the randomized number layout on the Trezor screen.
Trezor Suite does not show the numbers to prevent spying or keylogging.
Make sure no one is watching while you enter your PIN. If you forget it, you can reset the device using your recovery seed.
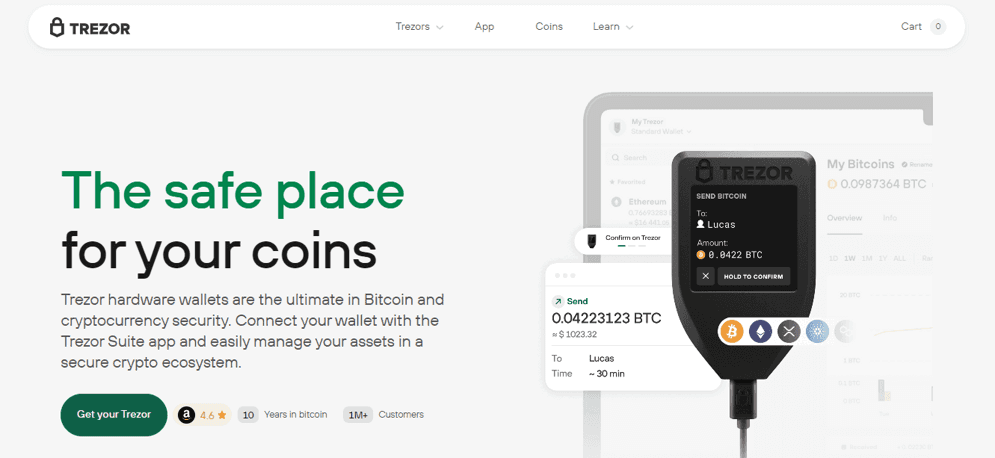
Step 4: Access Your Trezor Dashboard
After entering the correct PIN, you will be logged in to Trezor Suite. Here you can:
View your crypto accounts
Check portfolio value
Add or remove accounts
Install apps for supported coins
View past transactions
The dashboard gives you complete control of your wallet while your private keys remain locked inside the hardware device.
Step 5: Sending and Receiving Crypto
With Trezor Login complete, you can now manage your assets.
To send crypto:
Select the account you want to use.
Enter the recipient's address and amount.
Verify the transaction details on your Trezor screen.
Approve the transaction by physically confirming on the device.
To receive crypto:
Choose the receiving account.
Generate a receiving address.
Check the address on your Trezor device before sharing it.
The verification step ensures that the address displayed on your computer matches the address generated by the Trezor device.
Step 6: Maintaining Wallet Security
Trezor Login includes built-in security features, but you must also follow safe practices:
Only download Trezor Suite from the official website.
Keep your recovery seed offline and never enter it on a computer.
Avoid using your wallet on shared or public computers.
Update your device firmware only through Trezor Suite.
Double-check all transaction details on your Trezor screen.
These habits will help ensure that no one can gain unauthorized access to your funds.
Troubleshooting Login Problems
While Trezor Login is usually simple, some users may encounter issues. Common solutions include:
Device not detected: Try another USB port or cable.
PIN incorrect: Enter carefully; too many attempts will wipe the device.
Suite not loading: Reinstall the software from the official website.
Firmware problems: Follow Trezor Suite prompts to complete updates.
Most issues can be resolved by updating software and following the official guidance.
Conclusion
Trezor Login is a secure and user-friendly way to access your hardware wallet and manage your cryptocurrency portfolio. By connecting your device to Trezor Suite, entering your PIN, and verifying transactions on the hardware wallet, you ensure that your digital assets stay protected. Whether you are managing a few coins or a large portfolio, Trezor Login gives you complete control while keeping your private keys safe from online risks.